Old Warrior Renewed-The Fulton Armory M-1 Garand Review

The .30 caliber M-1 service rifle was developed by John Garand at the Springfield Armory in Massachusetts, and was adopted by the U.S. military in 1936. It was the first self loading rifle to see service in the U.S., and was the primary service weapon of U.S. forces in World War II and the Korean War. It continued on for training purposes and to arm our allies well into Vietnam. General George S. Patton famously called the M-1, “the finest battle implement ever devised”, and that reputation is well deserved. The M-1 is the iconic battle rifle. It’s armed men in combat all over the world, in every environment from the arctic cold of the Aleutian Islands to the jungles of Burma, and the deserts of the Middle East. In all those places, the M-1 proved itself as a reliable, accurate, and lethal weapon.

Today, the M-1 is still sought after by collectors, not only for its historical significance, but for its performance on the range. However, as time goes by, original M-1s are becoming increasingly rare. Enter Fulton Armory. They build new M-1s from a combination of new and G.I. parts. Original M-1s were chambered for the .30-06 round, and while Fulton Armory offers rifles in the original chambering, they also offer M-1s chambered for .308 Winchester. It is a rifle chambered for .308 that I’m reviewing here.

The rifle that was evaluated was built on a G.I. M-1 receiver

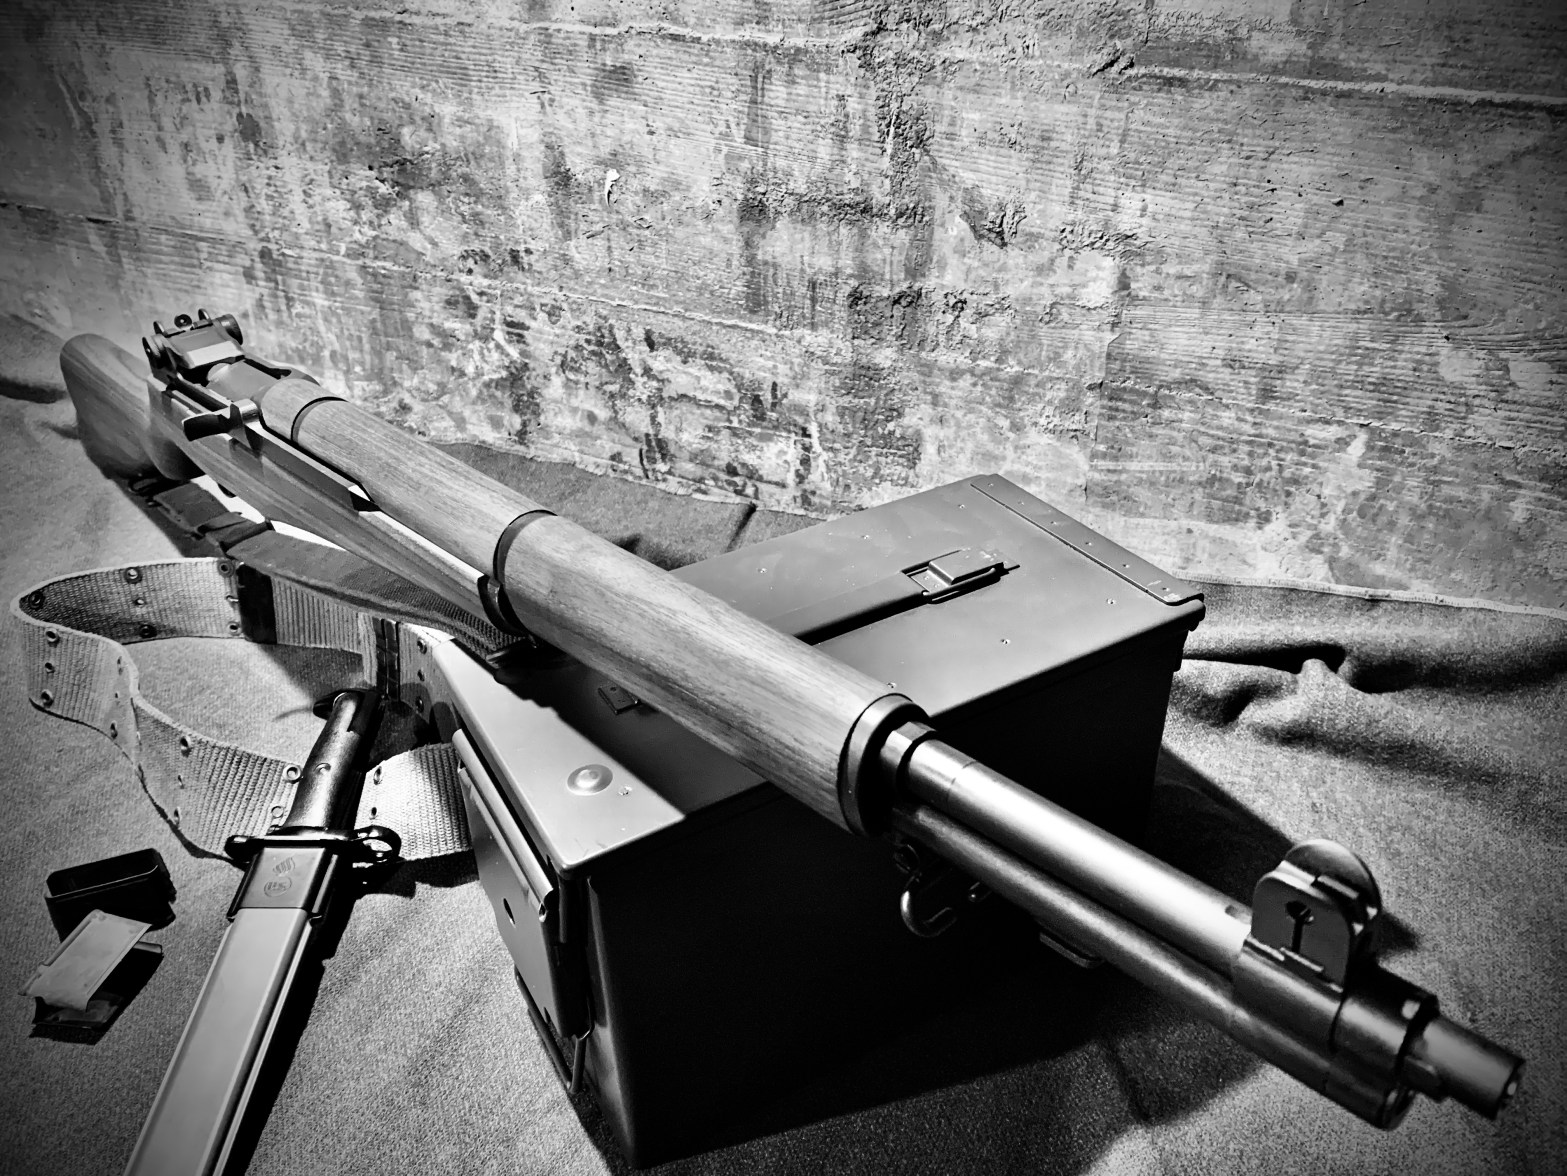
The first thing you notice about Fulton Armory’s M-1 is that it’s a fine looking rifle. The linseed oil finish on the Walnut stock gives the wood a deep, rich color. The parkerizing on the metal is even and uniform throughout. The fit and finish of the rifle, overall, is excellent.

The M-1 is a beefy rifle, designed in a time when stacking swivels were still a thing, and bayonet fighting was still a necessary skill. When marksmanship wasn’t just something taught, but the defining ethos of the rifleman. It was made in a time when rifles weren’t toys, and Fulton Armory’s rifle projects all of this.

So, why an M-1 in .308? It’s really just personal preference. I already have rifles chambered for it. By choosing .308, I don’t have to buy ammo in another caliber just to shoot the M-1. Does it make a difference? Not really. The .308 round is a shortened evolution of the .30-06 anyway. The case dimensions, aside from being shorter, are similar enough that the M-1 retains its original eight round capacity. The .308 and .30-06 are ballistically similar, as well.

Does a different chambering detract from the authenticity of the rifle? I would say no. After the adoption of the 7.62mm NATO round, the Navy actually re-chambered a number of M-1s, and continued to use them for some time. It is one of these rifles that the Fulton Armory M-1 in .308 re-creates.

Eight rounds of .308 ammunition still fit in G.I. en-bloc clips

As I said, the .308 chambering doesn’t change the rifle’s magazine capacity, and eight rounds of ammunition still fit in original G.I. en-bloc clips. The en-bloc is necessary to load ammunition into the M-1’s internal magazine. Thankfully, en-bloc clips are still readily available and inexpensive. So, it doesn’t break the bank to buy a bunch and load them up in advance of going to the range.

Aside from the different chambering, rifles in either caliber remain otherwise the same. Both have 24 inch barrels, and weigh 9 1/2 pounds. The walnut furniture is also identical. The only thing that visually differentiates a rifle chambered for .308 is a steel spacer block at the front of the internal magazine at the mouth of the chamber. The spacer ensures that the short .308 round will feed reliably from the longer magazine well, and makes it impossible to load .30-06 rounds by mistake.

The spacer in front of the chamber ensures .30-06 ammunition can’t be loaded by mistake

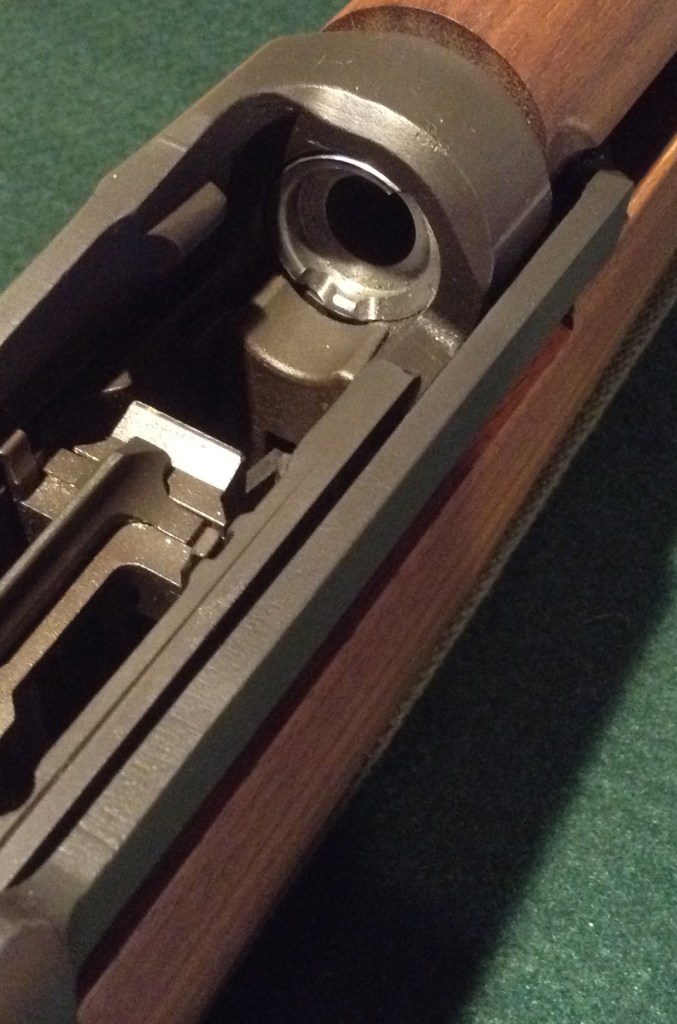
The M-1 breaks down into three groups: the stock, the trigger group, and the receiver group. To disassemble the rifle, pull down and forward on the trigger guard. When the trigger guard is fully disengaged, the whole trigger mechanism and the attached floor plate of the internal magazine will slide out of the bottom of the rifle. With the trigger group out, the stock can be separated from the receiver group.

Looking at the rifle broken down into its groups, I am always struck by the fact that during World War II, American paratroopers jumped into combat with their rifles disassembled like this. The first thing they had to do when they hit the drop zone was take the pieces of their rifle out of its case and assemble it. Often at night, and often under fire. That they could do that successfully under that stress is simply amazing.

In any case, to finish disassembling the receiver, flip it upside down and disconnect the recoil spring and remove it from its channel in the operating rod. Drifting out the retaining pin at the bottom front of the receiver allows you to remove all the parts of the internal magazine. With those out, the operating rod can be brought to the rear, rotated off the ear of the bolt and removed. Last, remove the bolt by bringing it forward out of the receiver.

The M-1 is a gas operated rifle. The long operating rod acts as a piston. During firing, gas is bled off from the ignited propellant through a small hole near the muzzle of the barrel. The gas bleeds into the cylinder directly underneath the barrel. The end of the operating rod sits in that cylinder, and as the gas expands, it pushes the operating rod to the rear, cycling the action. Carbon is a by-product of the burning propellant. So, during cleaning, take care to remove any carbon build-up on the end of the operating rod, or inside the gas cylinder. Also, while the M-1 was designed to be fired dry of lubricant, you should still make sure to apply moderate lubrication anyway to reduce wear on moving parts. Attention should be given to the channels in the receiver that the bolt and operating rod move along, and also the channels that direct the movement of the parts in the internal magazine.

Once cleaning is done, assemble the rifle in reverse order and do a function check. Then you’re ready to head to the range. And range time is what this rifle is all about. The feel of the sling tight on your upper arm, the audible “pop” when you let up on the trigger during follow through and it re-engages with the hammer, and the distinctive “ping!” of the en-bloc ejecting after the last round all make for a great day. What makes a great day even better is that this rifle is very accurate.

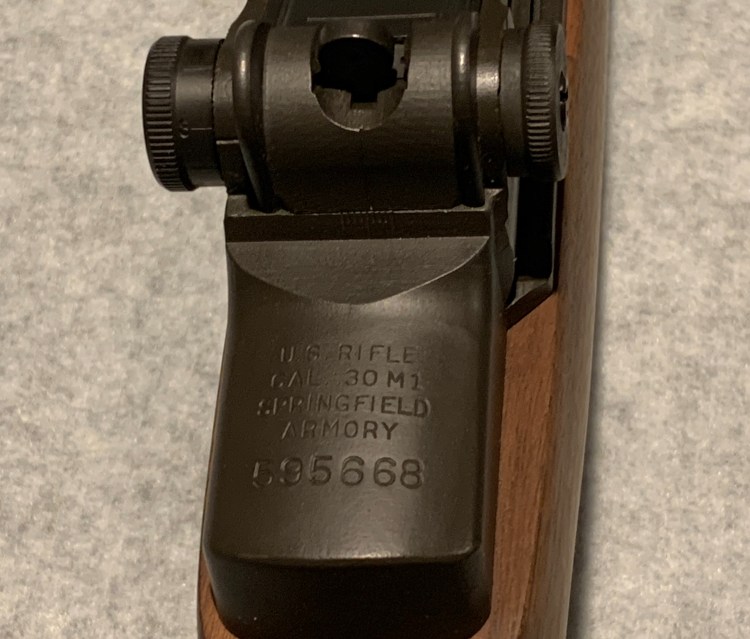
In my opinion, the M-1 has the best sights of any World War II era service rifle. Its fixed front sight blade and rear sight aperture that is adjustable for windage and elevation in increments of one inch of movement per click at 100 yards, allows for very rapid sight acquisition and accurate delivery of fire. The M-1 sight set up is so good, it has remained standard on every U.S. service rifle since.

To load the M-1, bring the charging handle back, lock the bolt to the rear with your right hand, and engage the safety. Keep your hand in place, with the blade edge against the charging handle. With your left hand, insert a loaded en-bloc clip into the magazine and push down with your thumb until it locks into place. Here’s where keeping your right hand against the charging handle pays off. When the en-bloc locks in place, it releases the bolt to move forward and chamber the first round. If your right hand isn’t there to hold back the bolt momentarily, it will move forward. If you don’t get your left thumb out of the way in time, it’ll result in a painful case of “Garand thumb”. Remove your right hand from in front of the charging handle, and let the bolt go forward. The first round is now chambered.

A quick note on ammunition is in order. The Fulton Armory M-1 is capable of safely firing both .308 commercial ammunition, and military 7.62x51mm NATO ball rounds. However, higher pressure commercial ammo such as Hornady Superperformance rounds should be avoided. The higher pressure rounds could cause damage to the rifle. Having experienced the catastrophic malfunction of an M-16, I can definitively tell you that you don’t want anything to do with something like that. So, use only standard pressure ammunition to stay safe, and keep your rifle functioning correctly.

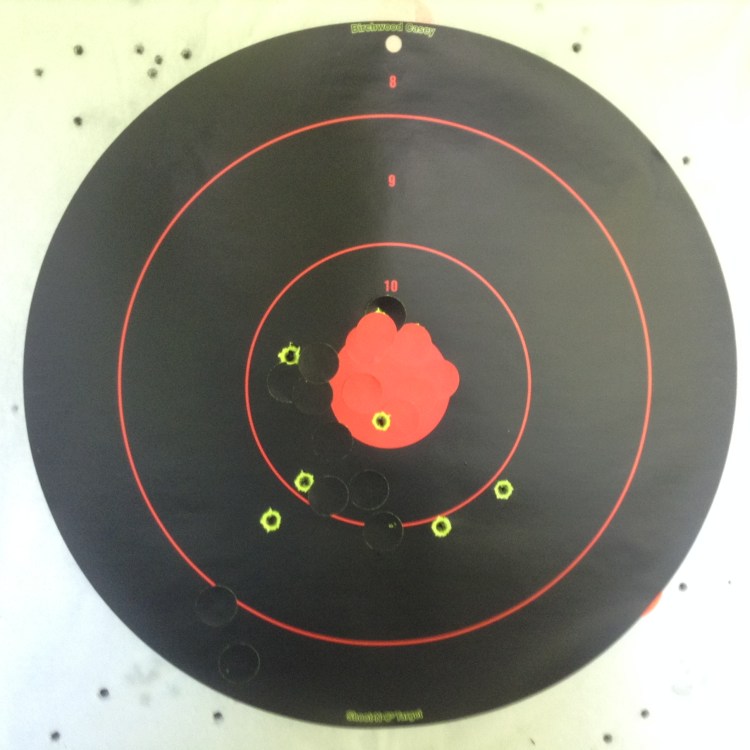
I don’t really like shooting service rifles from a bench rest. They really deserve to be fired with a sling, unsupported. But, since Fulton Armory guarantees that their rifle will shoot under 2 1/2 inches at 100 yards, I needed to shoot from a rest to test their claim. And their claim is, indeed, valid. With Remington standard 150 grain soft point ammunition, I achieved 5 shot groups that printed right at 2 1/2 inches. That’s excellent accuracy from a rifle with iron sights. The weight of the rifle made the recoil manageable, as well. The Fulton Armory M-1 isn’t just a good shooter, it’s a fun rifle.

Groups hovered around 5” at 200 yards- very good for iron sights

Fulton Armory’s M-1 is an outstanding rifle. I really like it when manufacturers’ products do what they are advertised to do. Fulton Armory’s M-1 does it in spades. It’s an excellent rifle that gives superior performance. Range time with it is a pure pleasure. MSRP for a .308 M-1 is $2000, which is actually not much more than what good examples of original M-1s are going for these days. The difference is that with Fulton Armory you know what you’re getting: a quality firearm that’s accurate as hell. You don’t have to guess like you would buying a surplus rifle. If you want to own the best infantry rifle of World War II, but one that still shoots like new with excellent accuracy, I highly recommend Fulton Armory’s M-1 Garand chambered for .308 Winchester.

Cowboy Scattergun- The PW87 Lever Action Shotgun Review

A while back, Century International started importing PW87 shotguns. When I saw they were available, I decided I had to check one out. With an asking price of $250, I could do it sooner than later. The PW87 is a reproduction of one of the original repeating shotguns, the Winchester model 1887. I’m always looking for good examples of different operating systems in firearms, and the 1887’s action is distinctive.

The PW87 is a lever action 12 gauge shotgun. It has a five round tube magazine that hangs under a 19 inch smooth bore barrel, both of which run into a unique humped receiver that houses the shotgun’s rolling block action. This is what makes the PW87 interesting. Instead of using a conventional bolt that moves through the receiver to cycle, the PW87’s action uses a large, one-piece semicircular breech block that rotates back into the receiver when the lever is pulled downward. That’s where the term “rolling block” comes from, and what gives the receiver it’s humped appearance.

The rolling block action is what gives the PW87 it’s distinctive humped shape

My first impressions of the shotgun, right out of the box, were very positive. The shotgun has an overall length of 37.25 inches, making it quick handling in brush or woodlands if used for hunting. The barrel is relatively short, with a permanent Modified choke. That makes it pretty obvious that the PW87 is not a first choice for skeet or trap shooting. But, in hunting situations where you’re flushing ground birds from heavy brush at close range, it just might fit the bill. The PW87 would also be a great fit for Cowboy Action shooting. The shotgun weighs 7.9 pounds, which is a little heavy, but it’s well balanced. I don’t find the weight to be a hinderance, and it works to offset the 12 gauge recoil. The metal on the shotgun is blued, and the finish on my example is deep and even throughout. The stock is of wood, in three pieces: the butt stock, and two hand guards placed on either side of the barrel and magazine tube- leaving the magazine tube partially exposed at the bottom. I found the wood to be tightly in place, with no play at all. It did not loosen during subsequent test firing. The finish of the wood is rich in color, and all three pieces of the stock match. All in all, the PW87 is a nice looking shotgun.

The first thing I did was read the manual and clean the shotgun. The manual is very rudimentary, with illustrations that are not well executed. It took me several times reading it through and referencing the gun before I was ready to begin breaking the shotgun down for cleaning. And it needed cleaning. Being new, the shotgun had gun grease all through the action, and the grease had attracted a lot of grit.

The PW87 loads and ejects through the top of the receiver, and is operated using the lever at the bottom of the receiver. To strip the shotgun, everything comes out of the receiver through the bottom, leaving it hollow. There are two main components to the action: the shell carrier and the breech block. The hammer and mainspring are housed in the breech block. To disassemble the shotgun, first pull down the lever to rotate the breech block back. This exposes the hammer and mainspring under the receiver. Next, loosen the two screws located on both sides of the rear of the receiver. These act as pivots for the shell carrier to move up and down, and loosening them puts play in the mechanism. Now, it gets a little difficult. With needle nose pliers, squeeze the mainspring together and remove it down through the exposed breech block. There is a lot of tension in the spring, so take care. The lever and breech block are held in the action by a pin they rotate around. The pin is held in place by hooks at the end of the mainspring. You have to compress the mainspring enough for the hooks to clear the pin. Positioning the pliers to get the mainspring out the first time is a little awkward. Once you’ve done it, however, it becomes clear how everything in the action is held in place. With the mainspring out, drift out the pin and completely remove the two loosened receiver screws. After that, all the remaining parts can be slid out the bottom of the receiver. Being a shotgun designed in the 1880’s, the PW87’s action resembles clockwork. If you take your time, though, disassembly is relatively straight forward.

The lock work of the PW87 is intricate. Disassembly can be tricky

Once the shotgun is disassembled, it’s immediately noticeable that the interior finish is not of the same quality as what’s on the outside. The interior parts are cast, and the surfaces where metal moves against metal are mostly unpolished. There are a lot of tool marks on the inside walls of the receiver. What this means is that, at least initially, the action will cycle pretty rough. I dealt with this by working the action a couple hundred times after reassembly. This caused the metal surfaces that move against metal to basically self-polish. Sure, it created wear marks on the finish, but the action smoothed out. The PW87 isn’t a collector grade firearm- it’s a shooter, so I didn’t see a little wear as a problem. Working the action this way, it’s essential to re-clean immediately. Otherwise, the metal particles that were polished off the action will foul the interior of the shotgun.

Reassembly is in reverse order. Once again, the trickiest part is to replace the mainspring and ensure it’s end hooks are set in place to retain it. It’s pretty tight working inside the receiver, and some of the surfaces are recessed. I recommend using a head lamp while you’re working to have adequate light to see what you’re doing. It makes reassembly a lot easier.

With all the preliminaries out of the way, it was time to take the PW87 to the range. My initial range time was disappointing. I started by function firing using 12 gauge 2 3/4 inch club loads. To load, you have to open the action by operating the lever. This also cocks the hammer. Then push the shell carrier down to expose the magazine. Rounds are fed into the magazine by placing the rounds into the receiver through the opening at the top, and then pushing them forward into the tube. Not difficult, but there are some sharp edges inside the receiver, so watch your fingers. Once the magazine is loaded, completely cycle the action once to put the first round in the chamber.

There is no safety on the PW87. There is a half cock position for the hammer, but there is no hammer spur and the hammer sits flush with the back of the breech block. To engage the half cock you have to grasp the hammer with your thumb and, pulling the trigger on a loaded chamber, gently lower the hammer to the half cock position. I recommend not trying it. I practiced with the gun empty, and found the combination of very little surface to grasp on the hammer and a very strong mainspring made putting the gun in half cock very unsafe. Pretty much every time, the hammer would slide from under my thumb and land all the way home. In my opinion, trying to engage the half cock is a recipe for a negligent discharge. That said, I have owned several exposed hammer guns without safeties through the years, and there is nothing inherently unsafe about them. With the PW87, as long as you don’t try to put the gun into half cock, it’s as safe as any of those other guns.

As I said, my initial round of firing was disappointing. I found that rounds fed and fired fine. But, every spent shell would hang up and cause a stovepipe failure to completely eject. I called it a day, and decided to do a little investigating. Through my investigation, I found that all the reviews I read or watched found the PW87 to be mechanically unreliable for the same reason: failure to eject spent rounds. While the extractors on the breech block reliably pull the spent shell from the chamber, it gets hung up on the front of the shell carrier and doesn’t fully eject. I pulled my copy of “Guns Of The Old West” off the shelf and found that when Winchester initially offered the Model 1887, it was chambered for 12 gauge 2 1/2 inch ammunition, not the modern 2 3/4 inch rounds. The PW87 is a reproduction made by Zhong Zhou Machine Works in China, and I think they missed something. Here’s my theory. I believe that when the manufacturer tooled up to reproduce the Model 1887, they chambered the gun for modern 2 3/4 inch ammo, but failed to change the dimensions on the receiver to account for the extra 1/4 inch. So, the gun loads and fires fine. But, when the shell un-crimps as it’s fired, it becomes too long to reliably eject.

To test my theory, I looked around for some 12 gauge 2 1/2 inch shotgun rounds. I finally found RST Shells, a company that specializes in making ammunition for older, fine shotguns. They have a variety of 12 gauge 2 1/2 inch loads on offer, so I ordered a couple boxes of their shells loaded with #10 shot. RST is a great company to do business with. Their customer service is excellent, and I had my shells in a couple of days.

2 1/2 inch ammunition (right), feeds and ejects reliably in the PW87

My second trip to the range went much better. I loaded up and fired several five shot strings for function testing. As I thought, the shotgun functioned flawlessly. In each string, all of the rounds ejected and cleared the receiver with no problems. The shotgun proved very pointable and well balanced. I was quickly able to index the front bead sight as I brought the gun to the shoulder and put the muzzle on target. At ten yards, shot patterns were even and centered on where I was aiming. Recoil was very manageable, thanks to the combination of the hard rubber recoil pad on the gun, and the ammunition I was using. The lever worked smoothly, though it kicked out a bit further than I’m used to when it was fully forward. Still, it wasn’t difficult to operate. For someone with a little longer reach than me, they wouldn’t even notice.

Shot pattern of RST Shells Woodcock load at 10 yards

So, once the bugs are all worked out, the PW87 is a great shotgun. Yes, you have to run 2 1/2 inch shells through it for it to function reliably, but that’s not a deal breaker. For Cowboy Action shooting, that just adds to authenticity. For a price tag of $250, it’s well worth it , given that original Winchester 1887’s and collector grade reproductions run in the thousands of dollars. If you’re looking for a shotgun with a unique action that’s fun to shoot, you should definitely look at the PW87.

The Bushnell TRS-25 Red-Dot Sight Review

Back in the stone ages (the late 1980’s), when I was in the infantry, the state of the art was the M-16A2 service rifle, and all we had for long range marksmanship and close quarters battle were iron sights. Fast forward to the early 2000’s, and I was again in the infantry after a break in service. This time, however, we were issued the new M68 Close Combat Optic. The CCO was basically the military version of the Aimpoint CompM-4 red-dot, and it was a game changer. While the CCO didn’t necessarily make shooting more accurate, it made acquiring targets a lot faster- especially when the target or shooter were moving. When I left the military, I was definitely a red-dot fan.

I felt sure that a red-dot sight would be perfect for hunting, but most red-dots, like Aimpoints and EOTechs, were set up for AR-15s. Tactical red-dots tend to be too big, bulky, and overbuilt to adapt for hunting purposes. Then I found the Bushnell TRS-25. It’s perfect for hunting applications.

The TRS-25 is a compact red-dot sight where the body of the sight incorporates the mount into a one piece unit. There are no rings to deal with for mounting. Because the sight is all in one piece, you also don’t have to worry about leveling the sight when you mount it to a firearm. The mounting screw acts as the recoil lug when mounting to a weaver rail as well. Even though the sight weighs only four ounces, it can take repeated recoil. I shoot .338 Marlin Express with mine, and the mount has never loosened, and the zero has not moved.

The one complaint I had with the M68 CCO, was that the on/off switch was a weak point. Under the kind of use we would put it through in the infantry, the switch could fail. I had multiple occasions where I brought my rifle up, and because of a faulty switch, there was no sighting dot. Not so with the TRS-25. The power switch is also the battery box and brightness control. The whole thing is a very rugged, weatherproof, unit. I have never had an occasion where the switch has failed.

The battery box and brightness control of the TRS-25 are combined into one, rugged, unit.

There are eleven brightness settings for the dot, which gives more than enough range to cover various lighting conditions- from full sun to darkness. The great thing about a red-dot is that in low light, you only have to be concerned with identifying your target, because you have a bright sighting dot, so you can get the most out of the times before sun up or after sundown.

As I said, red-dots don’t necessarily make your shooting more accurate, but they make target acquisition much faster. The key is, that with a red-dot you focus on the target, and don’t even look at the sight. This is very different from iron sights or conventional rifle scopes. With your eyes on the target, when you bring the rifle up and get cheek weld with the stock, the target dot should appear on your target. You don’t have to worry about centering the dot in the sight. Where the dot is on the target is where the round is going to go. The TRS-25 has no magnification, but depending on the caliber of your rifle, you should be able to land accurate hits anywhere from the muzzle to 300 yards. With mine at a 100 yard zero, I have no problem getting rapid hits from 25 to 200 yards. The target dot covers a three inch diameter circle of the target at 100 yards, so if you’re looking to shoot half inch groups from a bench, a red-dot may not be what you’re looking for. But, if you want to quickly acquire a shot into the vital zone of a moving game animal, the TRS-25 is the tool for the job.

The author took this boar with a TRS-25 mounted to a Marlin 338MX lever gun.

As for durability, the TRS-25 is a robust rifle sight. The body is filled with nitrogen and sealed with O-rings. I hunt in Maine in snow, rain, and cold. I have never had issues with fogging, condensation, or water infiltrating into the sight. Battery life is exceptional, too. The TRS-25 uses one wafer battery. I usually change it out before going to Maine, and then use it for the year. I have never had the battery die. Cold has not effected battery life either.

All in all, the TRS-25 is a great compact red-dot sight. I have found it to compare very favorably to other red-dots I have used, but in a smaller package. And, where an Aimpoint can run anywhere from $400 to $600, the Bushnell TRS-25 goes for around $150. I highly recommend it.

The SIG P938 Sub-Compact 9mm Pistol Review

I have always liked 1911 style pistols. The trigger pull is light and consistent, and the single action mechanism, when done right, is reliable. But, the 1911 is a big pistol designed for service use, and being that it was adopted in the early 1900’s, it’s designed for right hand use only. While it’s size is necessary to handle the .45 ACP round it was designed for, to me, it limits it’s utility for civilian use. Also, while the 1911 can be a very good target pistol, I’m looking more for something appropriate for everyday carry. Along that line, I don’t necessarily need the .45 ACP round either. 9mm is fine if it’s on a platform that allows for rapid, accurate, and consistent shot placement. So, when SIG brought out the P938, I was very interested to check it out.

The P938 is a compact single action pistol chambered in 9mm. It is a 1911 style pistol, but has some significant differences to the 1911 design. The P938 is based on SIG’s earlier P238, which is a compact 1911 style single action chambered in .380 ACP. For the addition of less than half an inch in length, SIG has given the platform up-gunned performance with the addition of the 9mm. In fact, the P938 is very compact. It has a three inch barrel, an overall length of 5.9 inches, a height of 3.9 inches, and a width of a little over an inch. For comparison of how compact it is, the P938 is only slightly larger than the Taurus PT-22 pocket pistol. However, while the PT-22 is chambered for .22LR, the P938 takes six or seven rounds of 9mm, depending on the magazine.

The P938 is almost as compact as a Taurus PT-22(right), but packs a lot more punch

The model I evaluated is the P938 Extreme. It comes with composite grip panels, An ambidextrous safety, and SIGLITE tritium night sights. The pistol comes in a package that includes a hard case, a cable lock, loaded chamber indicator, one six and one seven round magazine, a right hand holster, and manual.

First thing I did after taking the pistol home was read the manual and field strip the pistol for cleaning. The manual is very clear to follow. To dis-assemble the pistol, remove the magazine and ensure the chamber is clear. Once the pistol has been cleared, put the safety in the “fire” position.

The thumb safety on the Extreme is, as I said, ambidextrous, and, unlike the 1911, can be set with the hammer back or forward. Also unlike the 1911, the slide can be cycled with the safety on.

Next, pull the slide back on the frame until the slide stop aligns with the takedown notch on the slide. There are finger grooves on both the front and rear of the slide, making it easy to retain a grip on the pistol during this process. Again, unlike the 1911, there is no barrel bushing, making dis-assembly less complicated. Once the slide and the slide stop are lined up, take out the slide stop and bring the slide forward off the frame. Remove the recoil spring, guide rod, and barrel from the slide, and you ready to clean.

Once cleaning is done, assemble in reverse order. There is one catch. The ejector on the P938 is mounted to the frame. When mating the slide to the frame, you have to depress the ejector so the slide rides over it. Depressing it too far can actually cause a mechanical problem, so push down only until it clears the slide. Knowing that, re-assembling the slide to the frame doesn’t present any difficulty.

The ejector on the P938 is mounted on the frame. Important for re-assembly

After the pistol was cleaned, I took it to the range. For testing, I used Remington 115 grain Ball and Hollow Point ammo. I shot a total of 100 rounds at various distances out to 10 yards, and conducted drills moving forward, backward, laterally and to the oblique. At no time were there any malfunctions.

While the P938 weighs only 16 ounces, the recoil from the 9mm was mild. It was comfortable and controllable firing from both the strong and weak hand, with both one and two handed grip. Trigger pull was very consistent. The pull was between 7.5 and 8.5 pounds. While that may seem heavy, it does not detract from accuracy or controllability. Given that the trigger has a crisp let off, the heavier trigger pull is hardly noticeable.

Holding the pistol with a high grip was very comfortable. The hammer is bobbed, and while there is no grip safety like on a 1911, the beaver tail on the frame is still present, ensuring that there is no chance of “hammer bite” to the web of the shooting hand.

Accuracy was very good. I shot static at 5 inch bulls-eye targets, and moving at silhouettes. All rounds went where they were supposed to go. Shot groups of various lengths all stayed under a fist in size. The sights are easy to index, making target acquisition very fast. Also, the sights on my pistol were factory set so that point of aim equaled point of impact at the ranges I was shooting at. This was very good, because making sight adjustments on SIG pistols requires a sight adjustment tool and front sight blades of various heights, making it a fairly complicated process.

The P938 is an accurate pistol. Recoil is also very manageable for it’s small size.

The sights on my pistol were equipped with SIGLITE tritium for low light use. The sights are set in a three dot pattern: one on the front sight, two on the rear. The dots are meant to line up horizontally, instead of as a triangle, making for an uncomplicated sight picture. The tritium dots glowed bright, making it easy to pick them up in darkened conditions.

The pistol came with an outside the waistband right handed holster with adjustable tension. Drawing from the holster was very rapid, while it also maintained good retention. As a bonus, I found that the holster functioned even better inside the waistband left handed. Being left handed naturally, this worked out great for me. The pistol/ holster combo is very concealable.

I also tested carrying and drawing from a Blackhawk size 4 pocket holster. The techniques of concealed carry are beyond the scope of this article, so I won’t go into the pros and cons of pocket carry for single actions. I will only say that the P938/ Blackhawk combo was also very concealable, and the holster stayed in the pocket when the pistol was drawn, with no snags.

Overall, the P938 is a great pistol. I found it to be mechanically reliable, accurate, and very comfortable to shoot. All in a very compact package. It’s fit and finish is excellent, from it’s all-metal components, the fit of the grips to the frame, to it’s overall matte black coating. If you are looking for a compact 1911 style pistol, the P938 is an excellent choice.